You've just ordered your first miniature house kit. Maybe it's a cozy bookshop, a Victorian study, or a Japanese tea house.
The box arrives. You open it.
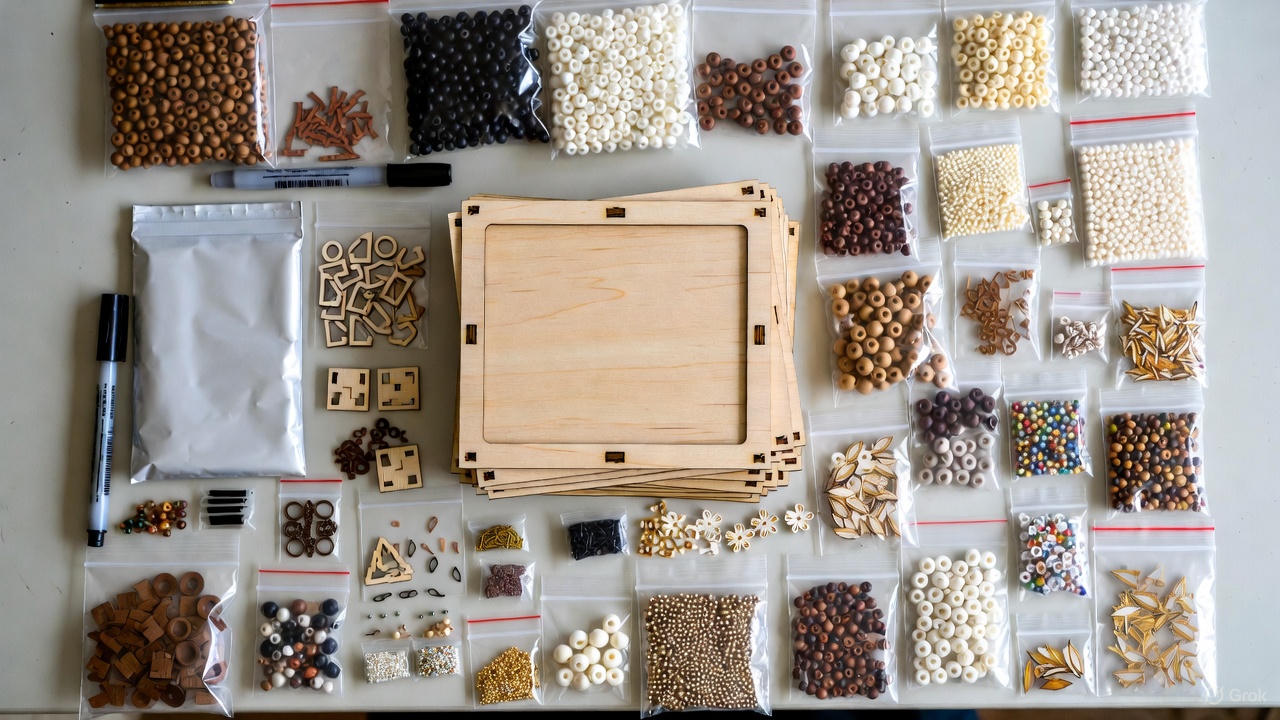
And suddenly you're staring at 200+ pieces of laser-cut wood, a bag of mysterious paper flowers, a coil of copper wire, and instructions that look like they were translated by someone who learned English from IKEA manuals.
Don't panic.
Building a miniature house is one of the most rewarding hobbies you can start with zero experience.
It's better than puzzles (those end when you place the last piece). It's better than adult coloring books (those go in a drawer and get forgotten).
When you finish a miniature house, you have a glowing, detailed diorama you built with your own hands—something you'll display on a shelf and still admire three years later.
But here's the thing: most beginners make the same mistakes. They glue things in the wrong order. They snap fragile pieces. They hide the battery box in a place they can't reach later.
This guide exists so you don't have to learn everything the hard way.
I've built over 60 miniature kits in the past decade. I've snapped stair railings, installed walls backwards, and once wired an entire lighting system only to discover I'd buried the battery compartment under a glued-down floor panel.
What follows is the complete lifecycle of a miniature build, broken into five phases.
Let's start at the very beginning: opening the box.
Phase 1: Inventory & Sorting (The Foundation).
What This Phase Looks Like You've opened the box. Inside, you find multiple sheets of laser-cut wood, bags of tiny accessories, hardware, copper wire, and a tube of mystery glue (throw it away—see my glue guide).
Your first instinct is to start building immediately.
Don't.
Spend 20-30 minutes organizing everything first. This is the difference between a smooth build and a frustrating one.
The Ziplock Bag System (Mandatory) Go to your kitchen and grab 10-15 small ziplock bags. Sort every piece by type:
- Bag 1: Large structural pieces (walls, floors, roof)
- Bag 2: Furniture pieces (chairs, tables, shelves)
- Bag 3: Tiny details (books, plants, jars)
- Bag 4: Doors and windows
- Bag 5: Stairs and railings (fragile!)
- Bag 6: Lighting components (wires, LEDs)
Why this matters: When the instructions say "attach piece F47," you want to find it in 10 seconds, not spend five minutes digging through a pile.
The Inventory Check Before you build, verify every piece is in the box. Lay out the instruction booklet and check off each piece.
Most manufacturers will send replacements if you contact them within the first week—but not after you've built half the kit and thrown away the packaging.
Phase 2: The Tiny Details (Build First).
Why You Start with Furniture, Not Walls:
Here's a rookie mistake: building the walls first, then trying to cram assembled furniture through tiny doorways.
The correct order: Build all the small, fiddly details first—books, plants, miniature food, furniture—then install them in the structure.
Building Miniature Furniture
- Punch out gently: Push from the back (the side with laser burn marks) to avoid splintering.
- Dry-fit: Assemble without glue to ensure it fits. Sand lightly if needed.
- Glue one joint at a time: Use Aleene's Tacky Glue. Apply a tiny amount with a toothpick.
- Let it dry: Full cure is 24 hours, but it's workable after 30 minutes.
The "Ugly Phase" At this stage, your workspace is covered in half-assembled furniture and sticky residue. The pieces look cheap. This is normal. Miniature houses look terrible until about 70% completion. Trust the process.
Phase 3: The Structure (Walls & Floors).
The Order Matters:
Most kits build from the bottom up: Floor -> Back Wall -> Side Walls -> Dividers -> Front Facade.
Read the instructions twice before gluing anything structural. Once walls are glued, they're permanent.
Applying Wallpaper (Do This BEFORE Assembly)
If your kit includes wallpaper, apply it to the flat wall panel before you assemble the walls. If you try to do it afterwards, you'll have awkward corners and misaligned seams.
The 90-Degree Rule Miniature houses have no forgiveness for crooked walls. If a wall is installed at 88 degrees instead of 90, every subsequent piece will be misaligned.
- Use a square: Use a carpenter's square or even a Lego brick to prop the wall up at exactly 90 degrees while the glue dries.
- Check alignment: You have 10-15 seconds of adjustment time with Tacky Glue. Use it to nudge the wall straight.
Don't Do This: Don't glue both side walls simultaneously. Glue one, let it dry, then attach the second using the first as a reference.
Phase 4: Lighting 101 (The Scary Part).
Why People Avoid This:
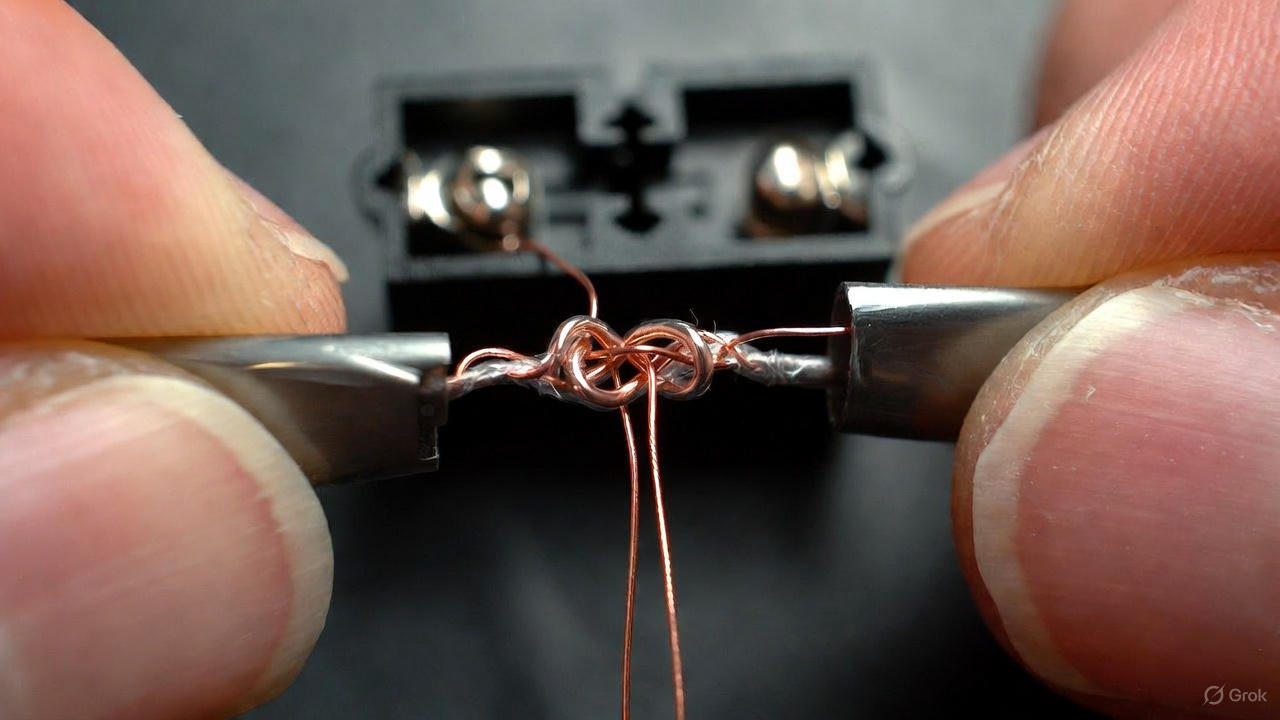
Wiring sounds intimidating. What if you wire it wrong? Relax. Miniature house lighting runs on 3V. You cannot hurt yourself.
The Wiring Process
- Plan your route: Look at the manual to see where wires go (usually along back edges or under floors) before you glue walls.
- Strip the ends: Use a craft knife to gently remove 5mm of insulation. Don't yank it or you'll break the copper strands.
- Test the circuit: Connect the wires to the battery box before you hide them. If the light doesn't turn on, check your connections.
- Hide the wires: Run them along seams and secure with tiny dabs of glue. Paint the copper wire with brown paint to blend it into the wood.
Critical Warning: Do not glue the battery box in a place you can't reach! I once buried a switch under a floor and had to drill through the base to turn it on.
Phase 5: The Roof (Gravity Is Your Enemy).
Why the Roof Is Hard:
You're attaching a heavy panel while fighting gravity. If it slides, your house looks crooked.
- Dry-fit first: Check if it sits flush on all four walls. Sand edges if needed.
- Glue in sections: Glue the back edge first, hold for 30 seconds, then do the sides.
- Use weights: Place a heavy book on top of the roof while it dries to prevent it from popping up.
Customization: How to Make It Yours.
- Painting: Use acrylic craft paint to change the color of a chair or wall. Paint before assembly. (Learn about acrylic paint here )
- Photos: Print tiny personal photos (1 inch tall) and glue them to the walls as "framed family portraits."
- Weathering: Dry-brush brown paint on edges or use sandpaper to make floors look worn and lived-in.
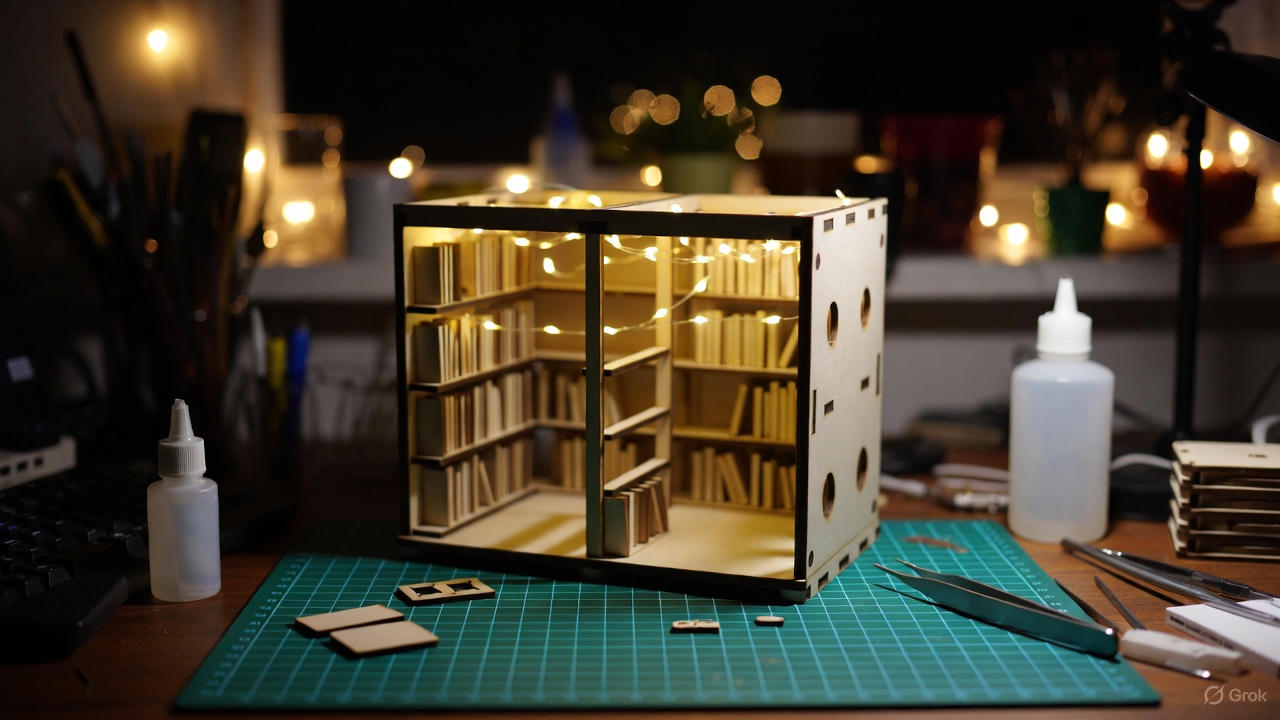
Conclusion: The Moment You Flip the Switch
Turn off the overhead light in your room. Flip the switch on your miniature house. Watch the LEDs glow to life—warm light spilling from tiny windows, casting shadows on the furniture you built piece by piece.
This is why people build miniature houses. It's about creating a tiny world with your hands.
You'll look at this build in six months and still feel proud. And then—because this hobby is addictive—you'll open another box and start again.
Welcome to miniature building. You're one of us now.
