
The Heartbreak of Dying Lights
You just finished your Rolife dollhouse. Three weeks of late-night assembly sessions—gluing wallpaper smaller than postage stamps, positioning furniture the size of thumbnails, threading LED wires through walls with surgical precision.
You placed the finished masterpiece on your display shelf, flipped the switch, and watched it glow with that warm, magical light that makes all those cramped-finger hours worthwhile.
Twenty-four hours later, the lights are noticeably dimmer. Forty-eight hours in, they're barely visible. By day three, they're dead.
Welcome to the cruel reality of battery-powered miniatures.
I've been building miniature kits for seventeen years. In that time, I've replaced approximately three thousand CR2032 coin batteries and cursed the design decision behind every single one. They die fast, cost money to replace constantly, and require you to disassemble your carefully arranged display just to access the battery compartment.
There's a better way. Converting your miniature kit from battery box to USB power is the single most impactful upgrade you can make. Once converted, your miniatures run indefinitely on wall power, never dim, never die, and can even integrate with smart home systems.
But—and this is critical—you cannot simply cut a USB cable and wire it directly to your kit. The voltage mismatch will destroy your LEDs within seconds.
This guide will teach you two proven methods to convert your battery box to USB safely: the no-tools "battery eliminator" approach, and the professional wire-splicing method.
Understanding the Voltage Problem (Why You Can't Just "Wing It").
Before we touch a single wire, you need to understand why voltage matters. This isn't academic theory—this is the difference between a successful conversion and a fried circuit.
What Your Kit Actually Needs Most miniature kits from manufacturers like Rolife, Cutebee, and Robotime are designed around a 3-volt power system. They achieve this using:
- Two CR2032 coin batteries (1.5V each) = 3V total
- Two AAA batteries (1.5V each) = 3V total
What USB Actually Delivers Standard USB chargers pump out 5 Volts.
The Math That Matters If you wire 5V directly to a 3V LED circuit, you are overvolting the system by 67%.
- Best Case: Your lights run extremely bright for 2-3 weeks before dying permanently.
- Worst Case: Immediate LED death with a brief flash and a smell of burning electronics.
Don't guess. You must use proper voltage conversion.
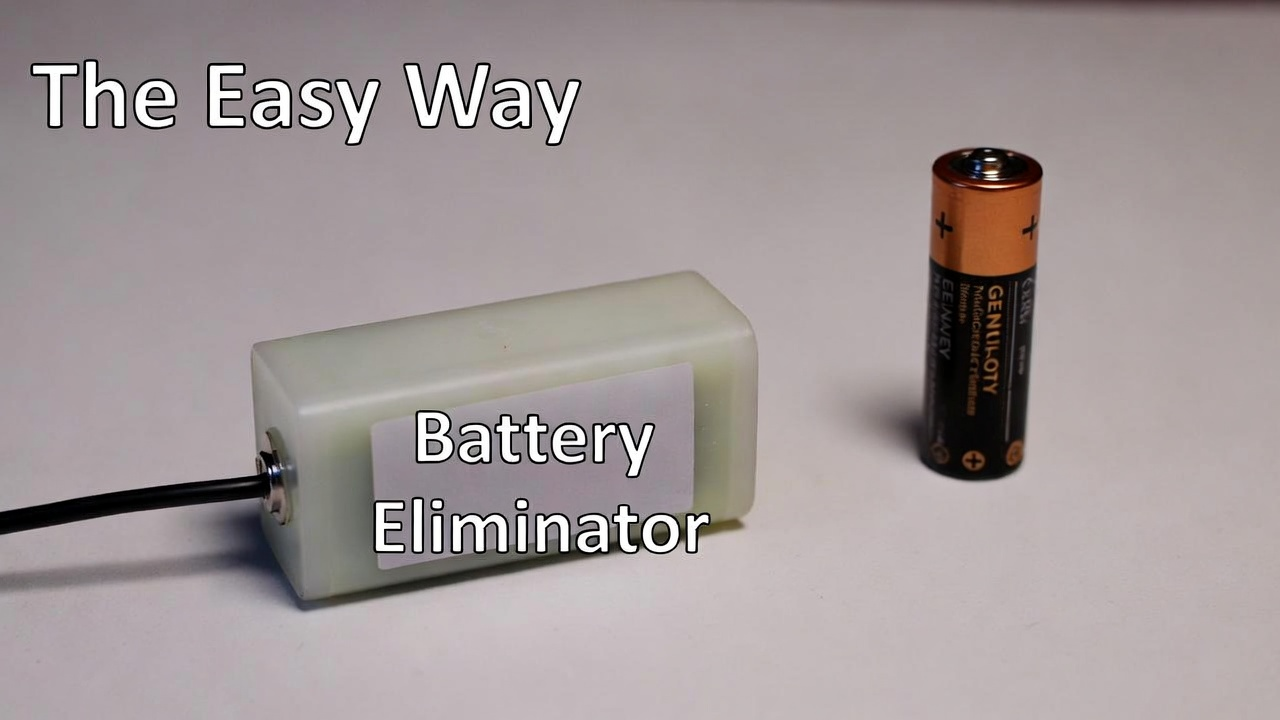
Method 1: Battery Eliminator Conversion (The Zero-Risk Approach).
If you've never stripped a wire in your life and the phrase "electrical splice" makes you nervous, this method is for you. It requires zero cutting, zero soldering, and zero electrical knowledge beyond "plug thing into wall."
What Is a Battery Eliminator? A battery eliminator is a clever device that looks exactly like a regular battery—same size, same shape—but it's hollow. Inside the fake battery is a voltage regulation circuit. A thin cable runs out of the battery case and terminates in a USB plug.
What You Need to Buy Search Amazon for these exact terms:
- For Coin Batteries: "CR2032 Battery Eliminator USB"
- For AAA Batteries: "AAA Battery Eliminator USB 3V"
Critical Tip: Verify the listing says "3V Output". Some eliminators output 4.5V, which is too high.
Installation Process (5 Minutes)
- Open the Box: Remove the old dead batteries from your miniature.
- Install the Dummy: Place the "Active" dummy battery (the one with the wire) into the first slot. Place the "Passive" dummy (plastic spacer) in the second slot.
- Route the Cable: Most battery doors have a tiny notch. Run the flat ribbon cable through that notch.
- Plug In: Connect the USB end to a wall charger.
Verdict: Perfect for absolute beginners or sentimental kits you don't want to permanently modify.
Method 2: Direct Wire Splice (The Professional Approach).
This method completely removes the battery compartment and splices in a voltage-regulated USB cable. The result is cleaner, more reliable, and easier to hide.
What You Need
- USB to 3V Step-Down Cable: (Search for "USB to 3V Power Cable Open End"). It must have a voltage regulator built-in.
- Wire Strippers: (Or sharp scissors).
- Electrical Tape: Black vinyl tape.
- Heat-Shrink Tubing: (Optional but professional).
Step 1: The Amputation (Point of No Return)
This is the moment that makes beginners nervous. You're about to cut your miniature's original wiring.
- Locate the battery box.
- Take your wire cutters.
- Snip both the Red and Black wires about 2 inches away from the battery box.
- Discard the battery box. You now have two wires dangling from your house.
Step 2: Strip the Insulation.
You need to expose the bare copper on four wire ends (The two from the house, and the two from the USB cable).
- Use wire strippers to remove about 0.75 inches of plastic insulation.
- Critical Reminder: If your miniature uses "Enameled Wire" (shiny copper that looks bare), you must scrape it with a knife or sandpaper until it looks dull. (See our [Troubleshooting Guide] for details on this).
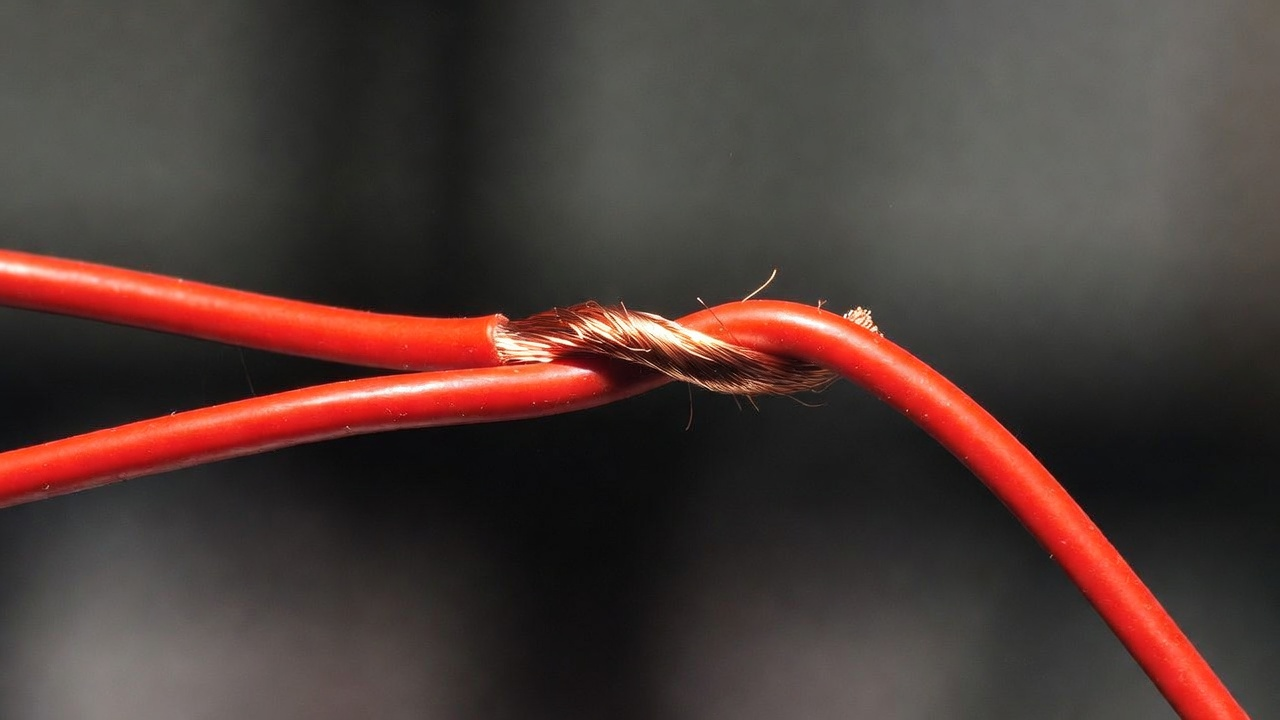
Step 3: The Color-Coded Connection
The universal rule: Red to Red, Black to Black.
The Western Union Twist: Don't just hold the wires side-by-side and twist loosely.
- Cross the two wires perpendicular to each other ("X" shape).
- Twist both wires around each other simultaneously.
- Result: A tight spiral connection that won't pull apart.
Step 4: The Smoke Test
Before you tape anything, plug it in.
- Lights On? Success.
- Lights Flickering? Twist tighter.
- Lights Off? Check your Red-to-Red connection.
Step 5: Insulation (Short-Circuit Prevention)
If the Red bare copper touches the Black bare copper, you create a short circuit.
- Wrap the Red connection tightly with electrical tape.
- Wrap the Black connection tightly with electrical tape.
- Strain Relief: Tape the USB cable to the bottom of the miniature base so that if you pull the cord, it tugs on the base, not your delicate wire splice.
Cable Management: Hiding Your Power Source.
You've successfully converted to USB, but now you have a cable sticking out. Here is how professionals hide the evidence.
1. The "Back Wall" Route Drill a small hole in the back wall of your book nook. Run the cable out the back. Use small adhesive cable clips to run the wire down the back of your bookshelf to the outlet. From the front, it is invisible.
2. The "Hollow Book" Concealment Buy a cheap hardcover book from a thrift store. Hollow out the center pages. Place this book next to your miniature. Coil the excess USB cable slack inside the hollow book.
3. Under-Shelf Routing Use adhesive cable raceways to run the USB cable along the underside of the shelf above or below.
Advanced Upgrade: Smart Home Automation.
Now that your miniatures run on USB power, you have unlocked God Mode.
Smart Plug Control Purchase a Smart Plug (like Kasa or Amazon Smart Plug).
- Plug your miniature's USB cable into the smart plug.
- Plug the smart plug into the wall.
- The Result: "Alexa, turn on the Book Nook."
The Vacation Protocol: Set a schedule in the app so your miniatures turn on at sunset and off at 11 PM automatically. Walking into your office at 6 PM and having twelve miniature scenes illuminate simultaneously is genuinely magical.
The Bottom Line: Freedom From Batteries.
Converting your miniature kit from battery power to USB isn't just a convenience upgrade—it transforms how you enjoy your art. No more climbing on step stools to replace batteries. No more dim lights.
I convert every single kit I build now. It is the first upgrade I perform, usually before I even finish assembly.
Your miniatures deserve to shine. Give them the power to do it forever.
Read Also: Don't Just Build It: 5 Easy Ways to Customize (Kitbash) Your Miniature House.
